


Pop-Up Panel Karte - Pop-Up Panel Card
Samstag, 10. September 2016

Hallo liebe Stempler!
Heute zeigen wir Euch, wie Ihr eine Pop Up Paneld Karte machen könnt. Wir sind darüber in diversen Videos im Netz gestoßen und möchten Euch nun auch eine deutsche Version zur Verfügung stellen, in der auch die Maße passend auf unser DinA4 angepasst sind.
***
Hello stampers!
Today we want to share a tutorial for a Pop Up Panel Card. We saw these on several videos online but haven't seen a german version. Here we also transferred the dimension to the german DinA4 size.
Für alle Cameo-Besitzer gibt es auch wieder eine Schneiddatei - zum Download kommt Ihr HIER.
***
For all Cameo users we also created a cutting file again - you'll get directed to the download HERE.
Ihr braucht:
1 Stück Cardstock 21 x 29,2 cm
1 Stück Cardstock 29,6 x 7,4 cm
1 Stück Cardstock 10,8 x 29,6 cm
2 Stück Cardstock 9,9 x 14,2 cm
4 Stück Cardstock 7 x 7 cm
Kleber, Schere, Falzbein, Lineal, Bleistift
***
You'll need:
1 piece of cardstock 21 x 29,2 cm
1 piece of cardstock 29,6 x 7,4 cm
1 piece of cardstock 10,8 x 29,6 cm
2 pieces of cardstock 9,9 x 14,2 cm
4 pieces of cardstock 7 x 7 cm
glue, scissors, bonefolder, ruler, pencil

Nehmt zuerst das Cardstock-Stück von 21 x 29,2 cm und falzt es längs an beiden Seiten bei 5,3 cm.
***
First take the piece of cardstock of 21 x 29,2 cm and score the short side at both ends on 5,3 cm.

Dreht den Cardstock dann um 90° und falzt die lange Seite mittig bei 14,6 cm.
***
Turn the cardstock an score the long side at 14,6 cm.
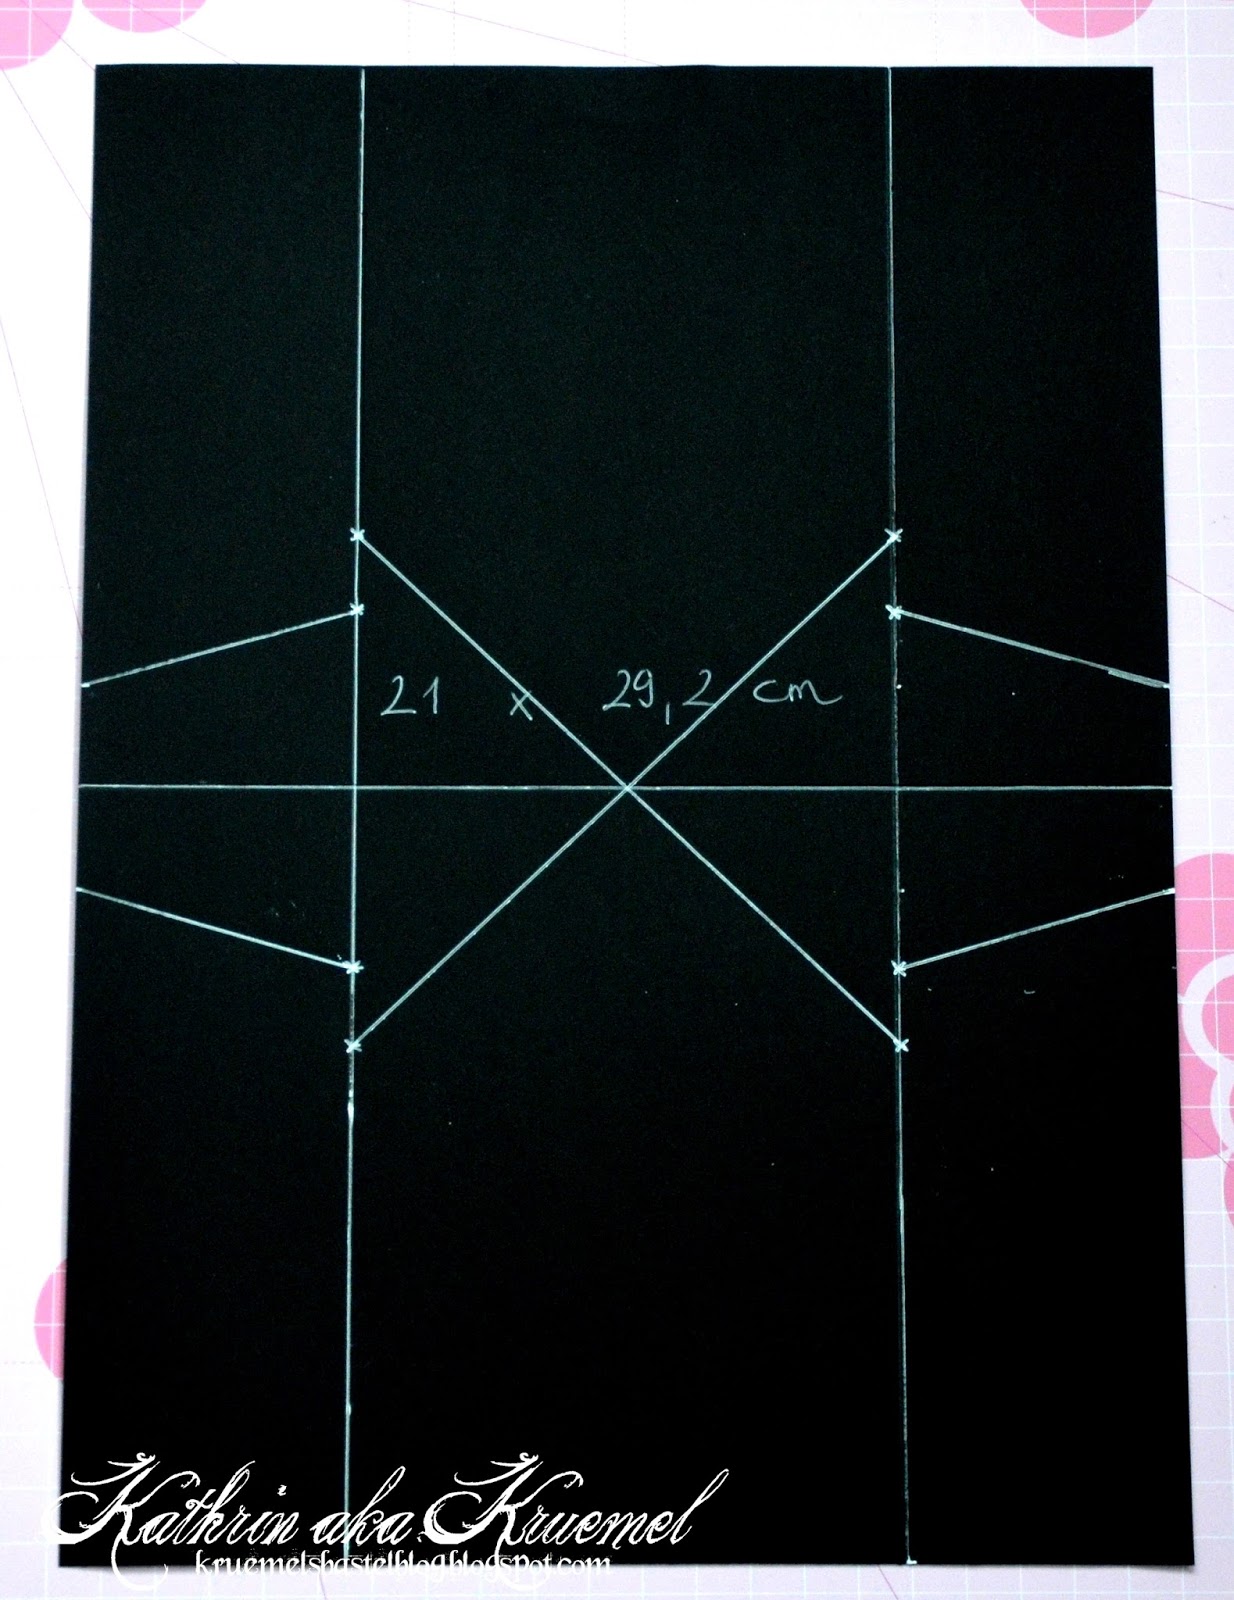
Erschreckt nicht vor dem Bild, das sieht komplizierter aus, als es ist. Aber nun ist Messen und Markieren angesagt.
Legt ein Lineal entlang der 5,3 cm Falz an und messt von der mittleren Falzlinie aus jeweils 3,5 und 5 cm ab. Macht Euch hier jeweils eine kleine Markierung. Am äußeren Rand des Cardstocks messt Ihr jeweils 2 cm ober- und unterhalb der Mittelfalz und macht auch hier eine Markierung. Wiederholt das ganze auf der anderen Seite. Verbindet dann die 2-cm-Markierungen an den äußeren Kanten mit der 3,5-cm-Markierungen. Die 5-cm-Markierung werden jeweils kreuzweise miteinander verbunden, fahrt diese Markierung dann mit dem Falzbein nach. Oben auf dem Bild könnt Ihr das gut erkennen.
***
Don't get scared by the picture, it seems way more complicated as it is. But now we have to do some measuring.
Take a ruler and align it along the 5,3 cm score line. Measure from the middle fold 3,5 and 5 cm to both sides of the score line and make a little mark there. At the outer edge of the cardstock you have to make that mark at 2 cm to the left and right of the middle fold. Repeat these steps on the other 5,3 cm fold. Then draw lines from the 2-cm-marks to the 3,5-cm-marks. The 5-cm-marks get connected to each other crosswise, these also got to be scored with your bonefolder. If you take a look at the picture you'll see it clearly.

Schneidet den Carstock dann wie auf dem Bild zu sehen zu.
***
Then cut the cardstock as shown on the picture.

Nehmt als nächstes den Cardstockstreifen von 29,6 x 7,4 cm und falzt die lange Seite bei 7,4 cm, 14,8 cm und 22,2 cm. Falzt ihn dann ziehharmonikaartig, der mittlere Falz zeigt nach oben.
***
Now take the strip of carstock of 29,6 x 7,4 cm and score the long side at 7,4 cm, 14,8 cm and 22,2 cm. Then fold it, the middle score is a mountain fold.

Für den nächsten Schritt merkt Euch bitte, wo Ihr den Kleber aufbringen müsst. Er kommt jeweils nur auf einen Teil der Seitenlaschen. Die habe ich für Euch mit einem X markiert.
***
For the next step keep in mind where to put the glue - it's only going to half of the side flaps. I made an X there.

Jetzt wird es etwas kniffelig - Ihr müsst hier ganz genau arbeiten, sonst lässt sich die Karte später nicht gut öffnen. Tragt also Kleber auf einen der mit X markierten Teile auf einer der Seitenlaschen auf. Klebt dort mittig dann das erste Quadrat des Carstockstreifens auf. Die Falzlinien müssen hier genau aufeinander liegen.
***
Know it's getting a little tricky - you have to work exactly or your card won't open right afterwards. So, put glue on one of the side flaps where there is an X and glue down there the first square on the strip of cardstock. The score lines need to be exactly on top of each other.

Hier noch ein weiteres Bild des vorherigen Schrittes, das rechte Quadrat ist hier noch nicht festgeklebt. Das tut Ihr als nächstes.
***
Here's another picture of the last step, the right square isn't glued down yet. That's what you'll do now.

Die beiden Cardstock-Stücke von 9,9 x 14,2 cm werden nun an der langen Seite rechts und links bei 9,2 cm markiert. An der kurzen Seite macht Ihr eine Markierung in der Mitte. Verbindet dann die seitlichen Markierungen mit der in der Mitte und schneidet die beiden Ecken ab. Ihr habt dann zwei "Häuser".
***
The two pieces of cardstock of 9,9 x 14,2 cm get marked on both long sides at 9,2 cm. The short side gets marked in the middle. Then draw lines from the side marks to the middle mark and cut off the corners so you'll get a house shaped piece of cardstock.

Klebt die 4 Cardstock-Stücke von 7 x7 cm auf die einzelnen Bereich des Cardstockstreifens...
***
Glue the 4 pieces of cardstock measuring 7 x 7 cm on the cardstock strip you adhered before...

... und klebt die hausförmigen Cardstockteile auf die obere und untere Lasche. Und nun kann es ans Dekorieren gehen! Zum Schluss kann Eure Karte dann so aussehen:
***
...and glue the house shaped pieces of cardstock on the other sides of the card. Now it's time to decorate your card. And this is what it could look like:


***
When glueing down decorations to the inside of our card make sure that the cardstock strip can still turn and fold without getting stopped by the embellishments. The googly eyes I gave my spider are a bit in the way...
Habt viel Spaß beim Nachbasteln!
***
Enjoy making your own pop up panel card!
Eure Kathrin
Und hier sind noch die Karten vom Rest des Teams:
***
And these are the cards the rest of the team made:


12 Kommentare:
Hallöchen, wunderbare Sachen habt ihr da wieder gewerkelt in tollen Farben - vielen lieben Dank für´s zeigen und eure immer tollen Ideen !!!! LG Nicole P.S.:Leider funktioniert der Link für den Download nicht ;0)
tolle idee und megatolle karten, bei mir funktioniert leider nur nicht der link zur schneidedatei...
Guten Abend,
toll ist diese Popupkarte. Ich möchte diese Karte gerne mit meiner Cameo werkeln. Leider ist aber die Schneidedatei mit dem Download nicht verlinkt. Könnt ihr das bitte noch nachholen. Vielen Dank, ein schönes Wochenende und
ganz liebe Grüße aus Franken
Marion
Hallo ihr Lieben,
wundervolle Karten sind entstanden. Eine so wunderschön wie die andere. Eine ganz besondere Kartenform in der viel Arbeit steckt. Großes Kompliment an das Team. Ganz liebe Grüße Silvi
Wow Klasse Karte. Aber leider geht der Download für die Schneiddatei nicht.
hallo, habe auch gerade festgestellt, dass kein Linke der Schneiddatei hinterlegt ist. Ansonsten ist die Karte wie immer sehr schön.
LG
Simone
Der Link zur Scheidedatei funktioniert jetzt :) Viel Spaß damit!
Love the Halloween card! What did you use for the black frame?
Patti, you mean the frame underneath the saying? It's a cutting die by Joycrafts, # 6002/0356.
Hi Kruemel, what a fantastic card you made. Thank you for your tutorial 😃
Bei dieser Arbeit sind wirklich schöne Karten entstanden. Darf ich fragen wie lange es gedauert hat? :D
Absolut GROSSARTIG :D
Kommentar veröffentlichen