


Teelichthalter
Samstag, 18. Februar 2012
Schon wieder ist Samstag uns somit Zeit für eine neue Anleitung. Ich möchte euch heute zeigen, wie ihr ganz schnell einen tollen Teelichthalter zaubern könnt.
***
It`s Saturday again and time for another tutorial. Today I`d like to show you how to make a beautiful tealight holder.
An Zubehör solltet ihr euch folgendes zurecht legen:
1x Cardstock 13 x 24cm (Teelicht-Schachtel)
1x Cardstock 9x24 (Rückwand)
Designpapier
ScorPal
Kreisschneider oder Spellbinder in Kreisform
Kleber/ Klebeband
Teelicht u. Teelichtglas
***
You need:
1 piece of cardstock 13 x 24 cm (for the box)
1 piece of cardstock 9 x 24 cm (for the back)
patterned paper
Scor pal
circle cutter or Spellbinder circles
glue/adhesive tape
tea light and tea light glas
Fangen wir an...
***
Let`s beginn:...

***
First we score the box. Put the cardstock onto the Scor Pal horizontally and score at 2 - 11 - 13 - 22 and 24 cm.

Nun wird der Cardstock in die Senkrechte gedreht...gefalzt wird bei 2 und 11cm.
***
Turn the cardstock round vertically and score at 2 and 11 cm.

Jetzt wird der Schachtel-Rohling eingeschnitten...wie ihr auf dem Bild oben sehen könnt. Zeichnet euch jetzt in das untere Quadrat mit Bleistift ein Kreuz auf die Innenseite des Cardstock´s...es soll eine kleine Hilfestellung sein, da wir als nächstes ein Loch für unser Teelichtglas einschneiden müssen.
***
Cut the box like shown on the picture above.Draw an X on the bottom square`s inside using a pencil ... this shall serve as a little help for the next step, which will be cutting the hole for the tealight glas.

Zentriert euren Kreis und schneidet ihn mit Hilfe eines Kreisschneiders oder auch Spellbinders in der Größe eures Teelichtglases aus.
***
Center your circle and cut it using the circle cutter or a Spellbinder Circle matching your tea light glas.

Jetzt muss die Schachtel nur noch zusammen geklebt werden...
***
Now glue the box together...

...zuklappen und schon ist unsere Teelicht-Schachtel fertig.
***
close it and the box is finished.


Viele liebe Grüße/All the best,
Yvonne
Kathrin

Natascha

Tanja

Heike

Simone

Jay Jay


close it and the box is finished.

Jetzt brauchen wir nur noch die Rückwand...nehmt den Cardstock und legt ihn waagrecht auf den Scor-pal und falzt ihn einmal bei 9cm. Die kurze Seite dient als Boden für unsere Teelicht-Schachtel...die lange Seite wird dekoriert!
***
For the back put the cardstock onto the Scor Pal horizontally and score at 9 cm. The shorter part will be the bottom of the box, the larger one will be decorated!

Ihr könnt jetzt die Schachtel und die Rückwand ausschmücken! Lasst auf der Rückwand im unteren Teil die Höhe der Teelicht-Schachtel frei und bringt dort zum Schluß noch ein Klebeband an...
***
Now its up to you to decorate the box and the back! Don`t decorate the lower part of the back (the height of the box) but affix adhesive tape to this part.

Zum Schluss wird die Teelicht-Schachtel noch auf den Boden und an die Rückwand geklebt und schon ist unser Teelichtglashalter fertig! Ich wünsche euch viel Spaß beim basteln!!!
***Finally glue the box onto the bottom and to the back and your tea light holder is finished. Happy crafting!
Viele liebe Grüße/All the best,
Yvonne
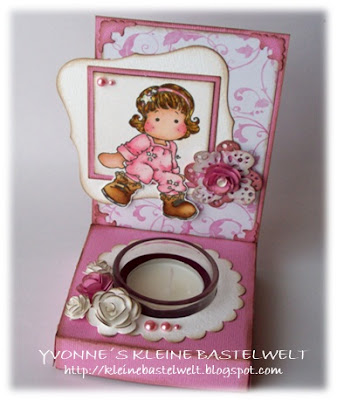
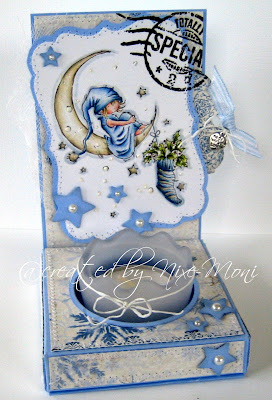
Und hier die Werke vom Designteam:
***
And here are the tea light holders of the design team:
Kathrin

Natascha

Tanja

Heike

Simone
Jay Jay


19 Kommentare:
Hallo liebes SEME-Team,
sofort sind mir gaaaanz viele Ideen durch den Kopf geschossen, als ich das heutige Thema sah.
Als Partylite-Beraterin sitze ich ja wohl an der Quelle. Mal sehen, was ich daraus mache.
Ganz liebe Grüße
Elfi
Hallo liebes SEME-Team,
tolle Anleitung und superschöne Werke habt ihr gemacht. Vielen Dank dafür.
LG Tina
Liebes SEME Team,
das ist ja eine klasse Idee und super schöne Beispiele.Vielen Dank für diese tolle Inspiration und die tolle Anleitung.Das probiere ich bestimmt bald mal aus.
Liebe Grüße
Angela
So glad to reach this blog!This new one is just wonderful.Thank you for the tutorial! You're a darling.
hugs,aureliaeugenia
Hallo liebe SEME Teamies :0)))
Dankeschön für die tolle Anleitung und die geniale Idee ... Eure Beispiele sind superschön ... das werde ich bestimmt mal ausprobieren ;0)
Liebe Grüße
Nicole
WOW! this is so cool, very beautiful proyect and idea, TFS and I can't wait to make one. Thanks for the tutorial, Zulma
Ihr habt wieder so toll gezaubert für uns! Ganz lieben Dank für die wunderschöne Anleitung und Anregung!
Euere einzelnen Muster sind alle ganz klasse, für jeden Geschmack etwas dabei.
LG die hippe
vielen Dank fuer die tolle Anleitung. Wie immer ist die so gut zu verstehen.
Gruss aus Colorado
Dagmar
Gorgeous creating DT! Love your scenes!
Vielen Dank für diese tolle Anleitung und den vielen Anregungen!!
Eure Beispiele sind *alle* wunderschön.
GLG Doris
What a beautiful idea, I love all of these tealight holders and thank you so very much for sharing with us
Hallo liebes Team.
Ich bin schon lange stille Leserin eures tollen Blog. Die vielen tollen Anleitungen und Ideen inspirieren mich jedesmal aufs Neue. Und auch diese ist wieder ganz toll.
Danke euch dafür.
GLG Claudia
hallo,
ich schaue erst seit kurzer Zeit bei Euch vorbei, ich bin einfach nur begeistert, ich habe auch schon 1,2 Dinge nachgewerkelt...
Aber dieser Kerzenleuchter ist wirklich besonders süß!!
LG aus Berlin
Hallo Ihr Lieben,
habe gestern meinen ersten Teelichthalter fertig gestellt.Falls Ihr mal schauen möchtet,hier ist mein Teelichthalter,den ich für eine Challenge gewerkelt habe.
Liebe Grüße
Angela
Das ist soo nett!!!
Hi,
Thank you for a lovely tutorial, It is really cute and have a couple of friends who will love these candle holders.
Thanks for sharing
Kath xx
Absolutely fantastic tutorial really loved what you have done here:)Sandra H
Very beautiful creations. Thanks for sharing your tutorial with us. I am goin to attempt doing this even if I have never worked with centimeters..A challenge for me.
hugs
bobbi
Hallöchen,
ich muß mal wieder eine Teelichtschachtel basteln. Es ist schön, das man bei euch dazu die Anleitung findet, denn diese Schachteln sehen einfach süß aus und machen überall Eindruck.
LG Anja
Kommentar veröffentlichen