


Schokoriegelspender à la Angela Schmahl - chocolate bar dispenser
Samstag, 11. April 2015
Hallo Ihr Lieben!
Herzlich willkommen zu einer neuen Ausgabe des Stempeleinmaleins. Sicherlich haben die meisten von Euch schon einen der tollen Schokoriegelspender nach der Cameo-Schneiddatei von Angela Schmahl gesehen. Da aber nicht jeder im Besitz dieses Zaubergerätes ist, haben wir bei Angela nachgefragt, ob wir für ihren Spender eine Anleitung für Nicht-Cameo-Besitzer schreiben dürfen - und sie hat ja gesagt! Und nicht nur das, sie hat uns sogar erlaubt, ihre Schneiddate hier für Euch - wie immer nur für den priavten Gebrauch - zum Download bereitzustellen. Ganz lieben Dank dafür, Angela! Die Schneiddatei findet ihr HIER.
***Hello friends!
Welcome to another issue of Stempeleinmaleins. Many of you may already have come across one of the chocolate bar dispensers made using the great Cameo cutting file by Angela Schmahl. But since not everyone of you or us owns one of these wonder machines we asked Angela if we can do a tutorial for how to make one of these dispensers without the machine - and she agreed! But not only that, she also said we can upload the cutting file - as always for personal use only - for you here on our blog. Big thank you to you, Angela! The cutting file can be downloaded HERE.
Nun, Ihr braucht:
- Cardstock 16,5 x 22,7 cm
- Cardstock 14,5 x 9,7 cm
- Cardstock 4,8 x 13,6 cm
- Schere, Kleber, Gerätschaften zum Falzen
- Designpapier
***
So, you'll need:
- cardstock 16,5 x 22,7 cm
- cardstock 14,5 x 9,7 cm
- cardstock 4,8 x 13,6 cm
- scissors, glue, scoring tools
- designer's paper

Wir starten mit dem größten Stück Cardstock. Legt es wie auf dem Bild auf Euer Scoringboard und falzt bei 0,7 cm, 9,2 cm, 11,7 cm und 20,2 cm.
***
We're starting with the biggest piece of cardstock. Put it in your scoring tool as shown on the picture and score at 0,7 cm, 9,2 cm, 11,7 cm and 20,2 cm.

Dreht den Cardstock um 90° und falzt bei 2,5 cm und 14 cm.
***
Turn the carstock 90° and score at 2,5 cm and 14 cm.

Schneidet den Cardstock dann wie auf dem Bild zu sehen zu.
***
Then cut the cardstock as shown on the picture.

Für die Spender-Öffnung wird nun an der rechten Seite an den rot umkreisten Stellen jeweils noch ein Stück von 1,5 cm Höhe aus den Seitenlaschen herausgeschnitten.
***
For the opening of the dispenser cut out a piece of 1,5 cm hight from the side panels where I made the red circles in the picture.

Weiter geht es mit dem mittelgroßen Stück Cardstock. Legt es wieder wie auf dem Bild zu sehen in Euer Scoringboard und falzt bei 1 cm und 13,5 cm.
***
Next we're using the middle sized piece of cardstock. Put it in your scoring tool as shown on the picture and score at 1 cm and 13,5 cm.

Dreht den Cardstock wieder um 90° und falzt bei 3,5 cm, 4,5 cm, 8 cm und 9 cm.
***
Turn the cardstock over and score at 3,5 cm, 4,5 cm, 8 cm and 9 cm.

Dann wird auch dieses Cardstock-Stück wie auf dem Bild zu sehen zugeschnitten.
***
Then also this piece of cardstock gets cut as shown on the picture.

Das kleinste Cardstock-Stück wird der Länge nach mittig - also bei 2,4 cm - gefalzt.
***
The smallest piece of cardstock gets scored lengthwise in the middle at 2,4 cm.

Dann wird dieses Stück Cardstock mittig zusammengeklebt und die Ecken werden an einer Seite abgerundet. Außerdem könnt Ihr auf diesen Streifen ein Stück eines nicht-rutschenden Materials aufkleben. Das kann Filz sein oder Samtfolie oder was immer Euch passend erscheint. Ich habe ein Stück selbstklebendes Leinen verwendet. Dieser Streifen verhindert, dass der Schuber unter dem Shokoriegel - und ohne es - herausrutscht.
***
Then fold this strip of cardstock, glue it together and round the corners of one side. You can also add a strip of any non-slippy material to this strip like felt or velvet foil or whatever you think might work. I used some self adhesive linnen. This strip avoids that the paper slides out from underneath the chocolate bar without bringing it out.

Dann klebt die beiden Boxen - Spender und Sockel - zusammen.
***
Then glue together both boxes - dispenser and stand.
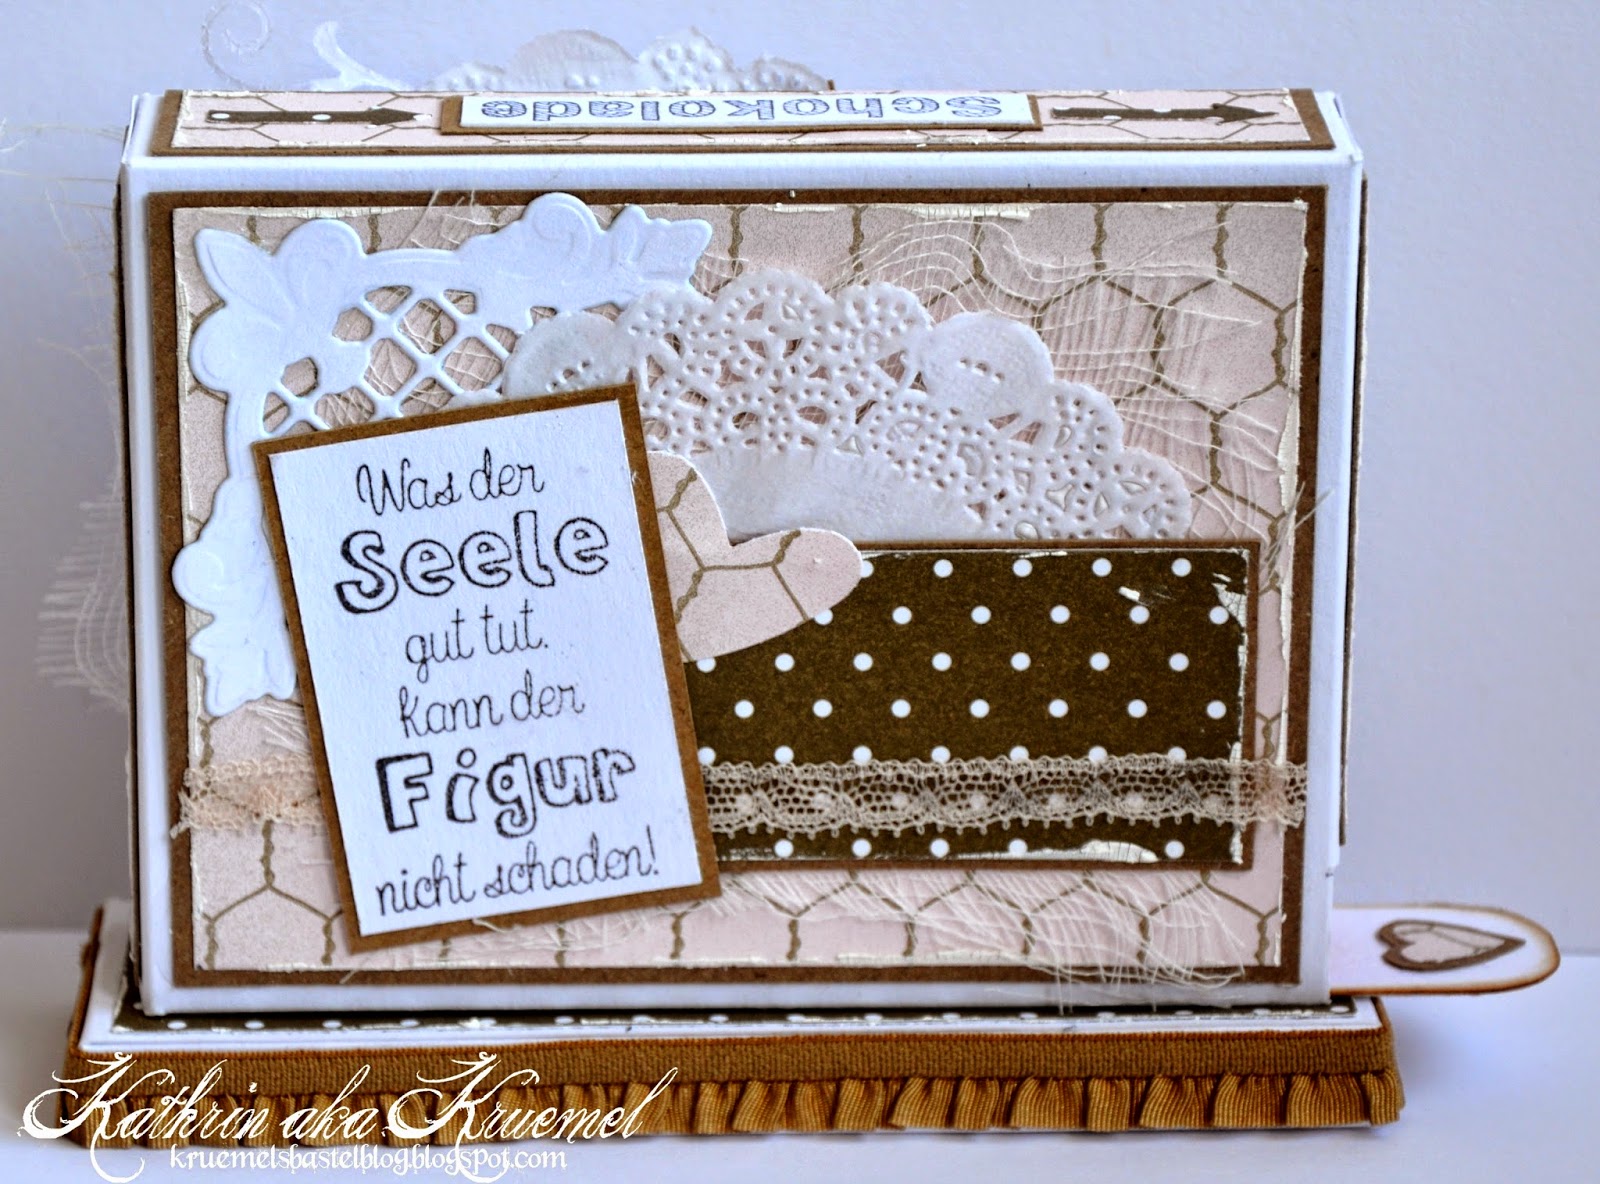
Jetzt ist der ideale Zeitpunkt, um Eure Teile zu dekorieren. Hier sind wie immer Eurer Phantasie keine Grenzen gesetzt.
***
Now is the right time to decorate the boes. As always - the sky is the limit here.
Und als letzten Schritt wird nun noch die Spenderbox auf den Sockel aufgeklebt. Ob Ihr die Box mittig aufbringt oder nach hinten versetzt ist hier Eurem persönlichen Geschmack überlassen. Dann wird der Zieh-Streifen in die Box eingelegt und die Riegel eingefüllt. Fertig! Uns so sieht mein fertiger Schokoriegelspender aus.
***
As a last step glue the dispenser box on the stand. It's up to you if you do this centered or aligned at the end. Then slide the paperstrip in the box and fill it up with chocolate bars. Done! And this is what mine looks finished.


Nochmal herzlichen Dank an Angela für diese tolle Idee und die Erlaubnis für dieses Tutorial! Und jetzt viel Spaß beim Nachbasteln des Spenders.
***
Big thanks again to Angela for this great idea and her permission to write this tutorial! And now have fun making your own dispenser.
Kathrin
Und dies sind die Schokoriegelspender vom Rest des Teams:
***
***
And these are the chocolate bar dispensers the rest of the team made:


10 Kommentare:
Vielen Dank an Andrea Schmahl und das Design-Team. Auf die Anleitung habe ich schon drauf gewartet, freu. Liebe Grüße
Sigrid
Toll,was Andrea da ausgearbeitet hat...Vielen lieben Dank!!und toll,wie Ihr es umgesetzt habt...alles prima Spender!
LG MSBine
How cute is this and what a terrific gift idea. Have put this away to do a little later. Thanks for the wonderful tutorial and the terrific inspiration of the team.
thank you for tutorial.. I love it..
Juhu!!!
Jetzt kann ich auch diesen superschönen Duplospender basteln!!!
(ich dachte schon, jetzt muß ich mir auch noch eine Cameo zulegen, aber es geht dank Euch zum Glück auch ohne).
Vielen Dank für Eure phantastischen Anleitungen, Vorlagen und Beispiele!!!
Ich liebe den Stempeleinmalein-Blog
:-)
Christiana
Eine tolle Geschnekschachtel!
Danke für die klasse Anleitung.
GLG Ines♥
toutes ces créations sont sublimes, bravo c'est franchement superbe et merci pour ce tuto que je garde précieusement!
Vielen Dank für die Anleitung, Vorlagen und die schöne Dispenser vom Team.
Ich habe gestern eine Dispenser gebasteld : http://wiescreablog.blogspot.nl/2015/04/chocolade-dispenser.html
L.G. Wies
Moin!
Vielen lieben Dank für die tolle Anleitung.
Da habe ich doch schon gleich eine Idee, für wen ich solch einen tollen Duplo-Spender werkeln kann.
Viele Grüße
Britti
Das ist super toll!!
Sehr schöne DT beitragen!!
Ein gutes wochenende,
Colinda
Kommentar veröffentlichen